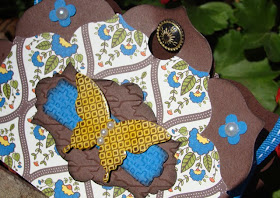
The inspiration for this purse came from my friend R.V. who challenged me to design a vintage purse. The vintage purse suggestion came right at the time when the Floral Frames Framelits were introduced and I was determined to work them into the design. I had the hardest time trying to come up with an idea for the sides of this purse, but after many trials, I came up with an accordion fold. The accordion fold allows for the purse to be opened up to box size, but also folded closed to create a pleasing triangular shape. I also added the option for a gift card pocket, brightly colored so that the recipient won’t miss it. The outside of the purse measures 5-1/4" W x 3-1/2" H x 1-3/4" D. If you would like to make your own vintage purse, just follow my tutorial below.
Floral Frames Vintage Purse Tutorial
Step One
1. Cut two of the largest floral frames in Chocolate Chip Cardstock with your Big Shot.
Step Two
2. Using the Simply Scored, score from the indent of one of the petals to the indent of a petal three over. Do this for both Floral Frame pieces. Note: To make lining up the indents easier I darken the 6” score groove with a black Sharpie.
Step Three
3. Fold the Floral Frames pieces along the score lines. Place two pieces of sticky strip on the three-petal portion.
Step Four
4. Cut a 4” x 1-¾” piece of Chocolate Chip Card Stock. Adhere the Floral Frames to this piece lining up the score line with the edge of the rectangle. The floral frames pieces will overlap.
Step Five
5. Cut two of the second largest Floral Frames in International Bazaar DSP with your Big Shot.
Step Six
6. Using your straight edge cutter, cut from the tip of one of the petals to the tip of a petal three over. Do this for both pieces
Step Seven
7. Adhere one of the International Bazaar pieces to the front of the purse as shown. Note: The paper does not wrap to the bottom of the purse. Using a ½” circle punch, cut a circle 3/8” down from the top petal of the purse.
Step Eight
8. Cut a 1-5/8” x 1-5/8” piece of Chocolate Chip Card Stock. Using your Big Shot, cut out one petal from the largest floral frames framelit out of this piece. This piece will be used to hide the back of the antique brad at the back of the purse.
Step Nine
9. Use the Paper Piercer to pierce the back of the purse 3/8” down from the top petal of the purse.
Step Ten
10. Insert an Antique Brad into the hole with the brad front facing the front of the purse and the ends sticking out the back.
Step Eleven
11. Adhere the petal piece from step 8 to the back of the purse to conceal the brad ends.
Step Twelve
12. Adhere the remaining International Bazaar piece to the back of the purse.
Step Thirteen
13. Cut two 3” x 2” pieces of Pacific Point Card Stock. On the long side of both pieces, score at 3/8”, ¾”, 1-1/8”, 1-½”, 1-7/8”, 2-1/4”, 2-5/8”.
Step Fourteen
14. Using the small punch on a Crop-a-dile or a 1/8” circle punch, cut a hole along the center score line 3/8” in from the top. Also put sticky strip on both ends of the card stock pieces.
Step Fifteen
15. Fold along the score lines as shown.
Step Sixteen
16. Remove the sticky strip liner. Attach the accordion pieces to the purse
Step Seventeen
17. Feed a 12” piece of ribbon through the holes in the sides of the purse. Knot the ends on the inside to secure in place.
Step Eighteen
18. Optional Gift Card Pocket: Start with a 4-¼” x 2” piece of Daffodil Delight Card Stock. On long side, score at 3/8” and 3-7/8”.
Step Nineteen
19. On short side, score at 3/8”.
Step Twenty
20. Cut away the two corners where the score lines intersect. Place sticky strip on all three sides.
Step Twenty-one
21. Remove all three pieces of sticky strip liner. Fold over the bottom first. Then fold in the sides. The sides should stick to the bottom piece.
Step Twenty-two
22. Adhere the gift card pocket to the inside the purse.
Step Twenty-three
23. Decorate the rest of the purse as desired.
Stampin’ Up Supplies: Papillon Potpourri Stamp Set (W 123757, C 123759); International Bazaar Designer Series Paper (126920); Card Stock: Chocolate Chip (102128), Pacific Point ((111350), Daffodil Delight (119683); Chocolate Chip Ink (126979); Simply Scored (122334); Big Shot (113439); Floral Frames Framelits (127012); Apothecary Accents Framelits (127003); Houndstooth Embossing Folder (123134), Square Lattice Embossing Folder (119976); ½” Circle Punch (119869); Modern Label Punch (119849); Elegant Butterfly Punch (127526); Itty Bitty Shapes Punch Pack (118309); Antique Brads (117273); Pearl Jewels (119247); Pacific Point ¼” Stitched Grosgrain (126878); Heat Tool (129053); Clear Embossing Powder (109130).
Shop Stampin’ Up! online anytime, just click HERE.
Thanks for visiting!! I love reading your comments!!


WOW this is amazing:-) TFS the tutorial.
ReplyDeleteYou've done it again! I've been thinking about something like this for a while, but you captured details I could never have dreamed of! I can't wait to try this one - thanks as always for sharing your amazing creativity!
ReplyDeleteThe is way full of sooooo much potential. I love it. TFS the amazing tute. Your creations are always inspiring.
ReplyDeleteVery creative idea. I love it when someone shows me another way to use items I have in an unexpected way.
ReplyDeleteThanks,
Susan