This is one of the fun pop-up gift card holders we made at a recent class. When you put a gift card in a fun holder, it becomes a memorable gift. The belt buckle was inspired by a cool scrapbook layout by Lyssa Zwolanek. The belt holds the card shut and makes the perfect accessory to the card. Both the Deco Labels Framelits and the Silver Glimmer Paper I used for this project are on SALE until December 2nd, 2013!!!!
If you would like to make your own Santa Pop Up Gift Card Holder, just follow my step-by-step tutorial. All supplies for this project are available for purchase below. Click HERE to see the complete supply list.
Santa Pop Up Gift Card Holder Tutorial
Step One
1. To make the card base, start with an 8-½” x 5-½” piece of Real Red CS. On the 8-½” side, score at the 4-¼” mark. Fold along the score line and set aside.
Step Two
2. For the faux fur front, start with a 4-¼” x 3” piece of Whisper White CS. On the 3” side, score at the 1-½” mark.
Step Three
3. Scallop edge punch both sides parallel to the score mark.
Step Four
4. Attach the faux fur piece to the front of the card base
Step Five
5. For the belt, cut an 11” x 1-¾” piece of Basic Black CS. On the long side, score at the 2-5/8” and 8-3/8” marks.
Step Six
6. Fold the belt along the score lines and put two pieces of sticky strip on both of the ends.
Step Seven
7. Using the two smallest deco label framelits nested into each other, run a piece of Silver Glimmer CS through the Big Shot to create a buckle.
Step Eight
8. Cut the second smallest deco label out of Basic Black CS. Also punch a Word Window piece out of Silver Glimmer CS.
Step Nine
9. Adhere all the pieces of the buckle together using tombow multipurpose liquid glue. Remove the sticky strip liner from the belt and adhere the buckle to it, bridging the gap between the two ends.
Step Ten
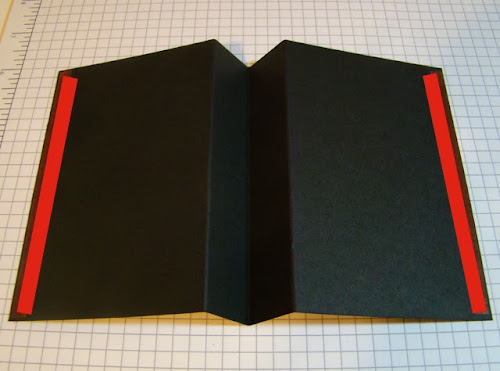
10. For the pop-up insert, start with an 8-½” x 5” piece of Basic Black CS. On the long side, score at the 3-¼”, 4-¼” and 5-¼” marks.
Step Eleven
11. Fold along the score lines, place sticky strip on both ends
Step Twelve
12. Remove the sticky strip liner and adhere the insert to the card base.
Step Thirteen
13. For the card holder, start with a 5” x 3” piece of Real Red Card Stock. On the 3” side, score at the 1-½” mark.
Step Fourteen
14. Center the smallest deco label framelits on the score line and run through the Big Shot.
Step Fifteen
15. On the score line, make a pencil mark ¾” in on both sides (see yellow dots).
Step Sixteen
16. Starting at the deco label hole cut a slot along the score line, just until the pencil mark. Note: cut along both sides of the score line so that the resulting slot is about 1/16” wide. Place sticky strip on both ends. Remove liner and fold piece in half along the score line.
Step Seventeen
17. Place sticky strip on the back of the card holder
Step Eighteen
18. Remove the sticky strip liner and adhere the card holder to the pop-up insert.
Step Nineteen
19. Decorate the inside of the card as desired. Tip: cut the leftover silver glimmer deco label piece (from the buckle) in half and layer it behind the Santa.


Brenda,
ReplyDeleteThank you for the great tutorial, I definitely will be making a few of these.
Super belle carte, merci pour le tuto ! Je me suis permise de mettre le lien vers votre blog qui es génial !
ReplyDelete