These were some of the Christmas ornaments I made as samples for my club workshops in November. The ornaments were made using a technique called tea bag folding.
Tea bag folding was invented in the Netherlands, in the 1990s by a woman named Tiny van der Plaas. The story goes that Tiny wanted to create a special card and hit upon the idea as she was folding her tea bag cover over and over. Of course you can imagine that the tea bag cover she was folding was much prettier than some of the commercial ones that we see in stores these days.
Basically, tea bag folding is a form of origami that uses small symmetrically patterned papers that are folded and glued together to create pretty medallions. I have also done tea bag folding with non-symmetrical patterns and have liked the results as well.
I used the tea bag folding technique to make ornaments, but it can also be used to make pretty focal points for cards and to adorn 3D creations. If you would like to make your own tea bag folded ornaments, just follow my video or step-by-step tutorials below.
Tea Bag Folded Ornaments Tutorial
Step One
1. Start with 8 squares of designer series paper. Card Stock is too heavy for this project. Make sure that you use squares that are at least 2” or greater. I’m using squares that are 2-3/8” for this tutorial.
Step Two
2. You will only see one side of the paper with this fold, so choose which one you like best and fold that paper to the inside first. Start by folding the square into a rectangle.
Step Three
3. Open the square up
Step Four
4. Fold the square into a rectangle again in the opposite direction.
Step Five
5. Open the fold up and the creases should form what looks like a plus sign.
Step Six
6. Flip the square over.
Step Seven
7. Fold the square along the diagonal to form a triangle. This time the pattern that you would like to show should be on the outside.
Step Eight
8. Open the square up
Step Nine
9. Fold the square along the diagonal again this time in the opposite direction. Leave the triangle folded this time.
Step Ten
10. Pick up the triangle by the fold. The open end should be facing the table.
Step Eleven
11. Push the ends of the triangle together to form a piece with a point in the center with 4 sides that jut out from it.
Step Twelve
12. Flatten the triangle making sure that two of the folds are on either side of the middle.
Step Thirteen
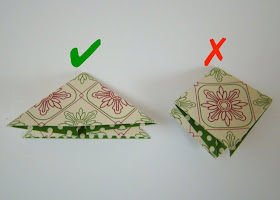
13. Your piece should look triangular like the sample on the left. If it looks square or diamond shaped like the sample on the right, you have folded the piece incorrectly and you will need to go back and refold it.
Step Fourteen
14. Repeat the steps for each of the squares so that you have 8 folded triangles in total.
Step Fifteen
15. Grab the first triangle with it’s closed point facing down (open end up). Open the two flaps up and place glue all over the inside.
Step Sixteen
16. Take the second triangle (flaps together) and place it between the two flaps of the first triangle. Make sure that the open end of the triangle is facing out.
Step Seventeen
17. Seal the end of the glued flaps around the second triangle and hold for a few seconds until the glue holds.
Step Eighteen
18. Now glue the rest of the triangles together one at a time, making sure the folded point is to the inside and the open ends are to the outside. The above photos show four of the triangles glued together from different angles.
Step Nineteen
19. This photo shows where the last triangle will be glued in place.
Step Twenty
20. After you glue the last triangle in place, you will need to glue it to the first triangle. Open the flaps of the last triangle and position the flaps of the first triangle inside. Put glue on the flaps and seal the triangles together.
Step Twenty-one
21. This is what your medallion should look like when it is completed.
Step Twenty-two
22. Punch a 1-1/4” scallop circle out of red glimmer paper. Pierce the punched piece in the center and adhere to the ornament with a glimmer brad.Pierce a hole near the top of the ornament about ¾” from one of the points.
Step Twenty-three
23. Thread a 10” length of baker’s twine through the hole and tie with a knot.
Stampin’ Up Supplies:
Shop Stampin’ Up! online anytime, just click HERE.
Thanks for visiting!! I love reading your comments!!


Brenda
ReplyDeleteLovely ornaments. I love iris folding.
It makes such pretty cards too.
Myrna
These are gorgeous. Love them. Thanks for the great tutorial.
ReplyDeleteLove Joan xx
WOW!!! Love them and so easy to do, Thanks for sharing.
ReplyDeletejeri
thanks for the great tutorial! My sister has decorated her tree with all handmade ornaments using pages from an old book instead of DSP so I made her one of these to add to hers! Thanks again!
ReplyDelete