I loved the Sweetheart Treat Bags from the moment I saw them and I knew they had to be part of my Sweet Valentine Class. These bags can be used as flat bags, but I thought it would be neat if we turned them into mini paper sacs. With just a few quick scores and a little adhesive on the bottom, the Sweetheart Treat Bags go from flat to sac. Let me show you how to make one below. The Sweetheart Treat Bags and all other supplies needed for this tutorial can be purchased at the end of this blog post.
Sweetheart Treat Bag Tutorial
Step One
1. Start with a 5 ½” x 3-½” flat Sweetheart Treat Bag. Place the bottom of the Treat Bag at the top of your Simply Scored. Score at the ¾” and 2-¾” marks.
Step Two
2. Turn the Treat Bag 90 degrees so that the bottom of the bag is along the side ruler of the Simply Scored. Score at the ¾” and 4-¾” marks.
Step Three
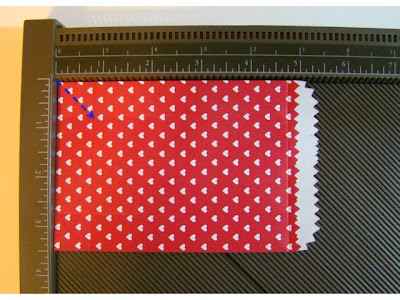
3. Place the diagonal plate on the Simply Scored. Put the bottom of the bag towards the side ruler of the Simply Scored. Score the bottom corner of the bag from the zero mark to the first score intersection.
Step Four
4. Keep the diagonal plate on the Simply Scored. Turn the bag 90 Degrees, so that the bottom of the bag faces towards the top ruler of the scoring tool. Score the bottom corner from the zero mark to the first score intersection.
Step Five
5. Fold the Treat Bag along the score lines.
Step Six
6. Open the Treat Bag up and put your hand inside it. Press down the corners first. Next fold the other score lines to form the shape of a bag.
Step Seven
7. Put multipurpose liquid glue on the corners. Fold the corners, press down and hold for a few seconds to seal.
Step Eight
8. Cut a 2” x 1-½” piece of card stock. Place the piece of card stock inside the bottom of the bag.
Step Nine
9. Fill the bag with candy and fold over the top along the score line.
Step Ten
10. Embellish the front of the bag. I adhered the banner from the Sweetheart Bag Kit. Then I stamp the “be mine” greeting from the stamp set “A Round Array” in Pool Party and punched it out with the 7/8” scallop circle punch. I layered this piece onto a real red circle punched out with the 1” circle punch. Also, Cut two small slits near the top sides of the bag.
Step Eleven
11. Tuck the baker’s twine from the Sweetheart Bag Kit into the slits to help hold it in place.
Step Twelve
12. Wrap the baker’s twine around the top of the bag several times and tie the ends with a bow.
Stampin' Up Supplies:


Great tutorial, many thanks Brenda. Am off to try ….
ReplyDeleteThanks for sharing, what a great idea!
ReplyDeleteSo incredibly cute and creative! Love, love, love these!
ReplyDelete