
Today we celebrated my friend’s milestone birthday with a surprise birthday party. I had to come up with something extra special as a favor for her party, something that she had never seen before. You might recognize the bottom of the cupcake from my Hershey’s Easter basket (Yes, I cased myself. LOL). Then I added another piece of card stock for the icing and finally a Hershey's kiss on top as a cupcake topper. I also added a little tag with the greeting “Happy Birthday Cupcake” from the Sale-a-bration 2013 Patterned Occasions Stamp set (available to earn until March 22nd, 2013). If you would like to make your own Hershey’s cupcakes, just follow my step-by-step instructions below.

Hershey's Cupcake Tutorial
Step One

1. Start with a piece of 9” x 2” Chocolate Chip Card Stock. On the long side, score at 5/8”, 1-¾”, 3-¾” and 7”.
Step Two

2. On the short side, score at the 1” mark.
Step Three

3. Squeeze some multipurpose liquid glue lengthwise along the strip.
Step Four

4. Fold the strip in half lengthwise and use your bone folder to burnish the strip.
Step Five

5. Fold the strip along the score lines. Squeeze some multipurpose liquid glue onto the tab end.
Step Six

6. Bring the ends of the piece together to form a cupcake-shaped trapezoid. Make sure you hold the tab down for a few seconds so that the glue can seal the card stock fibers together. Set aside.
Step Seven

7. Cut a piece of 7-¼” x 1” strip of Pretty in Pink card stock. Score at 3- ¼” and 6-¾”.
Step Eight

8. Fold the strip along the score lines and squeeze some multipurpose liquid glue onto the tab end.
Step Nine

9. Bring the ends of the piece together to form the cupcake icing.
Step Ten

10. squeeze some multipurpose liquid glue onto the flat bottom of the cupcake icing.
Step Eleven

11. Attach the icing to the cupcake. Make sure you hold the edges together for a few seconds so that the glue can seal the card stock fibers together.
Step Twelve

12. For the insert pieces, cut an 11” x 1” and a 7” x 1” strip of Chocolate Chip card stock.
Step Thirteen

13. Score the 11” strip at all the inch marks (1”, 2”, 3” etc.).
Step Fourteen

14. Score the 7” strip at all the inch marks (1”, 2”, 3” etc.).
Step Fifteen

15. Fold the 11” piece into triangles as shown.
Step Sixteen

16. Insert the 11” strip into the top of the basket.
Step Seventeen
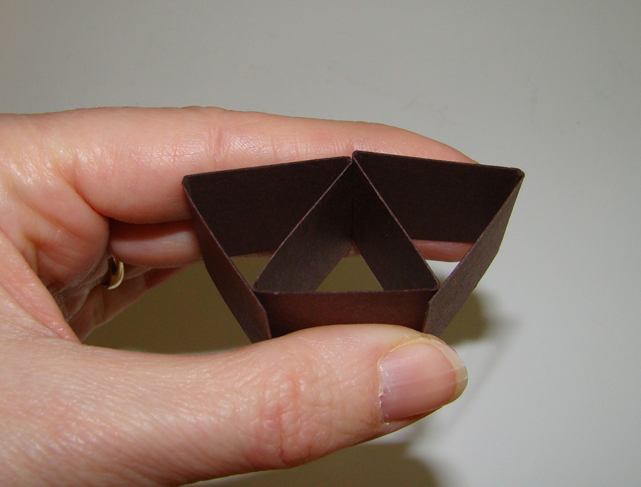
17. Fold the 7” piece into triangles as shown.
Step Eighteen

18. Insert the 7” strip into the bottom of the basket.
Step Nineteen

19. Pop the kisses into the triangular spaces.
Step Twenty

20. Put a dimensional on the bottom of a colored Hershey’s Kiss and adhere to the top of the cupcake
Step Twenty-one

21. This is what the cupcake looks like when it’s finished.
Time Saver Steps


Stampin’ Up Supplies:
Shop Stampin’ Up! online anytime, just click HERE.
Thanks for visiting!! I love reading your comments!!
So cute!
ReplyDeleteyour creativity never ceases to amaze! Thanks for sharing.
ReplyDeleteThese are adorable! Can't wait to make one!
ReplyDeleteADORABLE!!! You are so amazing! Thank you for being so sweet to share with us!
ReplyDeleteToo cute! Thanks for sharing.
ReplyDeleteI'm going to need to buy stock in Hershey Corp. if you keep creating these cute items!
ReplyDeleteSuper cute and thank you for the tutorial~~
ReplyDeleteHello!
ReplyDeleteYou are so clever that you just make me smile! When I see a new tutorial on your blog I it is always so wonderful! Thank you again for sharing your creations! Wishing you a happy weekend!
Hugs,
Barbara Diane
Love all your Hershey Kiss tutorials! THANK YOU SO MUCH!
ReplyDeleteThese are adorable!!
ReplyDeleteWhat a great idea. It's amazing!
ReplyDelete