
When I saw the new My Digital Studio downloads available this week, I fell in love with the little patterned reindeer (from the Reindeer Games Designer Template). What I didn’t love was, that his head was mounted on a wooden plaque as if he had been hunted. If you know anything about me, you’ll know that I’m a friend to all animals and a hunter, I am not. Soooo, I endeavored to turn my little friend into a 3D reindeer complete with a body.

The finished reindeer is approximately 8-1/2 H x 8-1/2 L x 5" W. I think he would make a cute Christmas decoration and an even cuter scene if you created all of Santa's reindeer. If you would like to make your own reindeer friends just follow my step-by-step tutorial below.
3D reindeer tutorial
Step One

1. Start by printing the reindeer games digital download. I printed page one (the reindeer cut-out pieces page) on Whisper White Card Stock first. Then I flipped over the card stock I had just printed and printed page two (the blue designer paper page) on the reverse side. This ensures that the pattern can be seen on both sides, rather than having one side blank.
I also printed just the blue designer paper on both sides of a sheet of whisper white. This piece will become the body of the reindeer. If your printer refuses to print on card stock, I have another solution for you (check out step 11).
Step Two

2. We are going to start off making the body. Use the sheet of whisper white that has just the blue designer paper printed on both sides. Trim off the white margins of your card stock piece (most printers don’t print right to the edges). Check both sides to make sure you have cut off all the white edges. Cut a 10” x 5-¼” piece out of this card stock. On the long side, score at the 5” mark.
Step Three

3. Fold the piece of card stock in half along the score line. With the folded edge hanging off the edge of the Top Note die, position the side that opens halfway over the top note area. This is where the top note comes to a ‘V’ on both sides.
Step Four

4. Put the Top Note through the Big Shot. This is how the piece will look after it’s cut.
Step Five
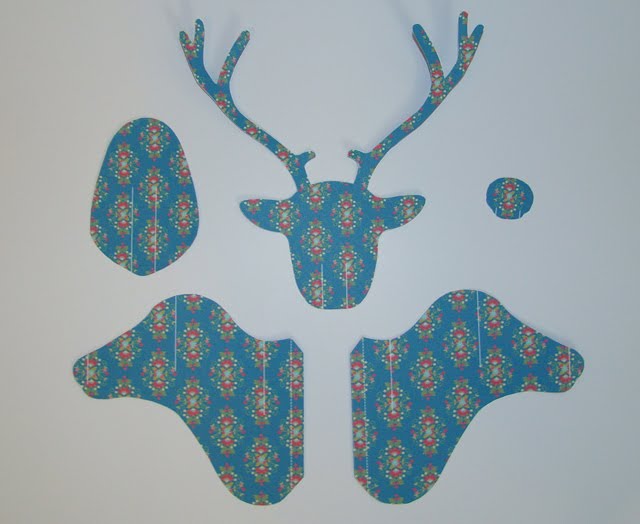
5. Now cut out all five head pieces. Also cut along the slot marks. Make sure that you don’t cut the dashed lines.
Step Six

6. Assemble the head, by carefully fitting the pieces into their respective slots.
Step Seven

7. Add an inch of sticky strip to both sides of the neck piece as shown. Only use about an inch of sticky strip, because a longer piece won’t allow the legs of the reindeer to open fully. I also cut along the top of the neck to straighten the edge just above where the sticky strip was placed.
Step Eight

8. Punch a tail out of a scrap piece of the blue designer card stock, using the ornament punch in the Merry Minis Punch Pack.
Step Nine

9. Cut a ¼” slot along the score line on one of the ends of the body piece. Fit the tail piece in the slot and adhere it with a mini glue dot.
Step Ten

10. Remove the sticky strip liner from the head piece and attach the head to the inside of the body piece. Decorate the rest of the reindeer as desired.
Step Eleven

11. If your printer won’t print on card stock. Print out the head pattern on computer paper. To waste less ink, I put a size 1 mat around each of the head pieces and changed the fill to whisper white card stock.
Step Twelve

12. I did a rough cut around all the head pieces and adhered them to a sheet of soft suede with some temporary Dotto. Then I cut each piece out carefully. In the photo you can see some of the cut head pieces along with the antler piece that I’m in the process of cutting out. If you would like more help in cutting out templates this way, please see HERE.
Step Thirteen

13. Finish off the reindeer as desired. For the eyes, I used two of the largest pearl jewels, colored black with a Sharpie Marker. For the nose I punched the circle from the trio punch pack out of red glimmer paper and adhered it with a mini glue dot.
Stampin’ Up! Supplies:
Shop Stampin’ Up! online anytime, just click HERE.
Thanks for visiting!! I love reading your comments!!
Super cute! I love the body you made! Thanks for the printing tips, too!
ReplyDeleteA terrific tutorial...these reindeers are too cute. Thanks for taking the time to do this.
ReplyDeleteYou're just amazing.
ReplyDeleteClever lady! I was bothered by the mounted head, too, but never thought of trying to alter it. Great idea, and a very thorough tutorial. Thank you so much.
ReplyDeleteI don't have MDS, I love your deer - I collect deer and have them in our home year around....you did a great job and thank you for sharing with us!
ReplyDeleteAbsolutely adorable!!!
ReplyDeleteBrilliant!
ReplyDelete