
I designed this purse for the Creative Crew honor your mother challenge. I went through several sheets of paper coming up with this design with the new diagonal score plate. The scallop heart from the hearts collection framelits makes the perfect purse flap. I used the summer smooches designer paper to give this purse a vibrant, summery feel.

The scored purse is 5” x 3” at the base and 2-7/8” tall. If you would like to make your own purse, just follow my tutorial below.
Scored Purse Tutorial
Step One Purse Base

1. Start with a piece of card stock 9” x 11”. On the long side, score at 3” and 8”.
Step Two

2. On the short side, score at 3” and 6”.
Step Three

3. Still on the short side, score 1-½” down on the 4-½” score mark. You can either eyeball how far 1-½” down (it’s halfway down to the first score line) or you can take a strip of paper and align it with the 1-½” mark on the side bar of your Simply Scored. REPEAT for the other short side.
Step Four

4. Place the diagonal plate on your Simply Scored. With the short side of your card stock along the top, place the ball of your stylus tool at the intersection of the score lines 6” over horizontally and 3” down vertically. Score from this mark diagonally towards the 3” mark, but stopping halfway there. Turn your card stock and REPEAT for the other short side. Flip your card stock over and REPEAT for both short sides. You will be making four diagonal scores in total.
Step Five
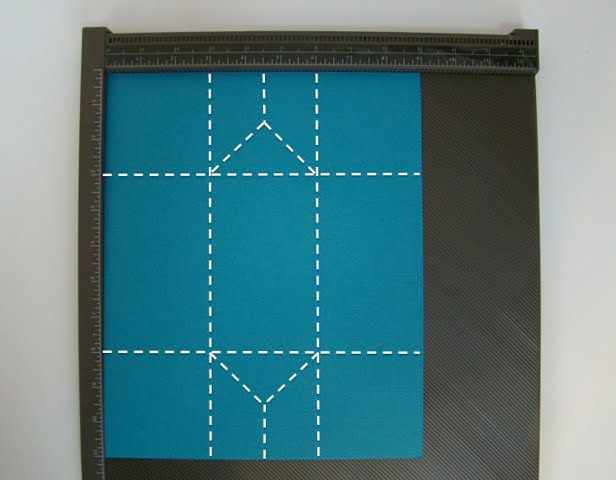
5. Here is how your piece should look after you have finished step 4.
Step Six

6. Cut away the four corners of the card stock, leaving FOUR ½” tabs. Place a piece of sticky strip on each of the tabs.
Step Seven

7. Turn piece over and fold along the score lines as shown.
Step Eight

8. Remove sticky strip liner and bring together to form box.
Step Nine Purse Flap

9. Cut two scallop hearts from the Hearts Framelits Collection. Adhere together using the Anywhere Glue Stick. You may use only one card stock scallop heart as the purse flap if you wish, just omit the second heart.
Step Ten

10. From the top middle of the heart count over 11 scallops on either side and make a pencil mark the indentation just below the 11th scallop. Score across the heart from pencil mark to pencil mark. Score the heartTip: Darken the 6” score line of your simply scored for easier free hand scoring.
Step Eleven

11. Now count down 3 scallops on either side from the score line you just made and score a parallel line. Note: The bold white dashed line is where you are scoring in this step. The thinner white dashed line is where you scored in step 10.
Step Twelve

12. Place double sided adhesive on the top part of the heart above the first score line. Punch two holes for the handle in between the two score lines.
Step Thirteen

13. Place a 1” strip of double sided adhesive next to the crop-a-dile holes. Feed a length of ribbon through each of the holes. Remove the adhesive liner and adhere the ends of the ribbon to the purse flap.
Step Fourteen

14. Remove the adhesive liner from the top of the heart. Adhere to the back of the purse box lining up the score line with the edge of the box.
Step Fifteen

15. Use a Velcro coin to keep the purse closed. Decorate the rest of the purse as desired.
Stampin’ Up Supplies:
Stamp Sets: Loved Ones (125465 WM, 125467 CM), Fabulous Phrases (117002 WM, 120501 CM); Card Stock: Island Indigo Texured, Island Indigo, Real Red; Paper: Summer Smooches DSP (125409); Ink: Versamark; Heat Tool (100005); White Embossing Powder (109132), Simply Scored (122334), Diagonal Plate (125586); Big Shot ; Hearts Collection Framelits (125599); Punches: Decorative Label (120907), Boho Blossoms (119858) Small Heart (117193); Island Indigo Ruffled Ribbon (122974); Real Red Brads (119740); Rhinestone Jewel (119246); 5/8” White Brad (122533); Sticky Strip; Anywhere Glue Stick.
Other Supplies: Velcro Coins
Shop Stampin’ Up! online anytime, just click HERE.
Thanks for visiting!! I love reading your comments!!
Thank you for sharing your tutorial, you purse is beautiful - I do love those gorgeous new papers...... hope they land in the UK!!
ReplyDeleteLove it! Thanks for sharing!
ReplyDeleteHello!
ReplyDeleteThis is so beautiful! I love this project! Thank you so much for sharing your great tutorial! I am making one today! Wishing you sunshine!
Hugs,
Barbara Diane
Love 3-d projects. This purse is so cute and your directions are great. Thanks for sharing with all of us.
ReplyDeletewow!!! love it !!!
ReplyDeleterosiemini@gmail.com
www.scraplovingminis.blogspot.com
Lindo, maravilhoso!!!
ReplyDeleteBjos!!!
Spectacular! tfs!!!!!!!!
ReplyDeleteYou get an A for adorable!!! Love it.
ReplyDeleteThanks so much for all cute tutorials. Love the purses!
ReplyDelete