
It’s wedding season and what better way to WOW a new couple than to make them a pop-up card. I made this particular card for an upcoming wedding that we are invited to. I recycled and changed my very first pop-up idea (from 2005) to create this fun card. If you would like to make your own angle fold pop-up card, just follow my tutorial below.

Step 1 Pop-Up Piece
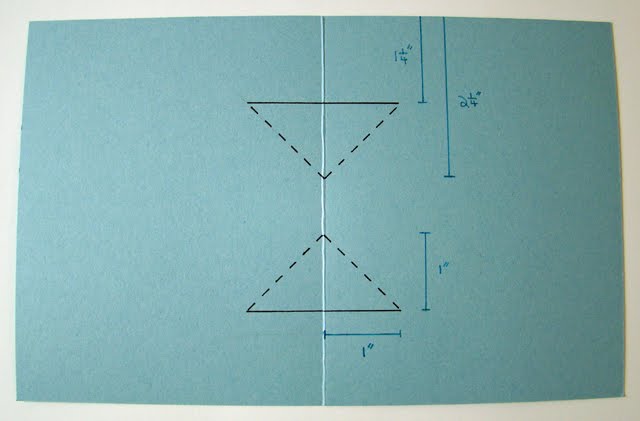
Start with a piece of card stock 5-¼” x 8-¼”. Score on the long side at 4-1/8”. This piece will nest inside a regular-sized card base (5-½” x 4-¼”).
On the score line, make a pencil mark at the 1-¼” and the 2-¼” marks from the top and the bottom. Draw a light pencil line perpendicular to the score line at both 1-¼” marks. Along the perpendicular pencil line, make a pencil mark 1” away from the score line on both sides (see solid black line). Connect the marks you just made with a pencil and ruler to the nearest 2-¼” mark to form two triangles that are centered on the score line (see dashed black line).
Step 2

Use a ruler and a stylus tool (or bone folder) to score the lines that you just connected (see dashed black line in step one).
Use a ruler and a hobby blade to cut the two 2” perpendicular lines (see solid black line in step one).
Fold the triangles towards the inside of the card as shown.
Step 3

Decorate the inside of the card as desired. Add a small piece of double-sided adhesive to the top of each pop-up triangle (see photo for placement).
Step 4

Turn the piece to the back. Put a strip of adhesive along both of the outer sides.
Step 5
 Without removing the adhesive liner, place the pop-up piece inside the card base. Make sure the inside piece is straight and the pop-up piece is all the way back against the score mark of the card base.
 Step 6
 Remove the adhesive liner and close the card carefully. Flip over and repeat for the other side.
Step 7 Wedding Rings
 Punch a 1-¾” circle out of a piece of brushed gold card stock. Make sure the card stock is pushed all the way to the back of the punch before punching.
 Step 8
 Take the piece of brushed gold cardstock that you just punched and center the circle in the hole of the 2-½” circle punch, to create a ring-shaped piece. Make two.
Step 9
 Remove the adhesive liner from the pop-up triangles and adhere the brushed gold rings.
Step 10 Ribbon
 Weave an 18” length of taffeta through the gold rings and adhere on opposite card corners. Note: I tied a knot at the midpoint of the ribbon to symbolize “tying the knot.”
Step 11
 Decorate the front of the card as desired.
Supplies:
Stamp Sets: Word Play, Curly Cute; Paper: Elegant Soiree, Soft Suede, Baja Breeze, Shimmery White, Brushed Gold; Punches: 1-¾” Circle, 2-½” Circle; Very Vanilla 5/8” Taffeta; Basic Pearls; Big Shot, Perfect Polka Dots Embossing Folder; Heat Tool; White Embossing Powder; Double-sided adhesive.

Additional Samples:
Two Butterflies Pop-up Card
Thanks for visiting!! I love reading your comments!!
Wow! I love your pop up card-so creative. Thank you for sharing your talents with us.
ReplyDeleteLovely, I like it very much. Blessings LM
ReplyDeleteOh Lady, this is an awesome card!!! I love pop-ups and this is my fav!!! Sorry I haven't been around, nursing a bad neck!!! Miss you. Hugs,
ReplyDeleteThis is so awesome! I love it!
ReplyDeleteLovely idea and pop up card. I just love pop up cards myself and have quite a few on my blog. Do drop in some time.
ReplyDeleteCheers from Bangalore ,India
Dr Sonia S V
ENT Surgeon and Avid Crafter
http://cardsandschoolprojects.blogspot.com
cute idea! thanks for sharing
ReplyDeleteBrenda you are the clever one! Very creative twist on a pop up card... and yours is beautiful.
ReplyDeleteSUPER SHARP CARD!!!!!!!!!! :)
ReplyDeleteI Love you card idea, thank you for sharing:)
ReplyDeleteWhat a lovely card! ♥♥
ReplyDelete