
Yesterday I showcased my Heart-shaped Valentine's Card and today I'm going to show you how to make a cute lined envelope for the card to go in. I learned how to make the perfect-sized Envelope Punch Board Liner from the fabulous Frenchie. I used her general instructions with a few changes to write my step-by-step tutorial below. Find out the supplies you'll need and where to get them HERE!
Envelope Punch Board Envelope Liner Tutorial
Step One

1. Start with an 8-1/2" x 8-1/2" piece of card stock. Line the edge of the card stock up with the 4-1/8" mark on the Envelope Punch Board. Push the punch button. Also use the scoring tool provided, to score from the button on the diagonal along the score groove. Note: I followed the dimensions for the 5" x 5-1/2" card printed on the Envelope Punch Board. If you need additional help, watch THIS VIDEO by Stampin' Up!
Step Two

2. Turn the card stock 1/4 turn counter clock-wise. Line up the score mark you made in step one, with the point extending from the punch button. Push the punch button and score once again. Repeat two more times until all sides have been punched and scored.
Step Three

3. This is what the piece looks like once it has been punched and scored.
Step Four

4. Choose one of the card stock corners to corner round. Use the guides on the top of the Envelope Punch board to align your card stock and then push the punch button.
Step Five

5. The yellow arrow is pointing to the corner I corner-rounded. Depending on which point you corner-round, you may get a different measurement than mine in step six. This is because the envelope is not symmetrical.
Step Six

6. Measure from the middle of the corner rounded point to the side of the card stock where the two score lines meet. In my case, I measured 4-1/4". Now subtract 1/4" from the number you measured. For my envelope, it's 4-1/4" minus 1/4" equals 4". Note: You can make a liner this way, for any size envelope.
Step Seven

7. The answer to your math problem in step 6 becomes the dimension the for the square you will cut. In my case, I cut a 4" square of designer series paper. Line the designer series paper up at the same measurement that you cut your square at. In my case, I lined my paper up with the 4" mark. Push the Punch Button.
Step Eight

8. Flip your designer series paper over to the other side and make sure that the corner you just punch is on the diagonal across from the one you will punch next. Line the paper up at the same mark as you used for step seven. In my case, it's the 4" mark. Push the Punch Button.
Step Nine

9. Corner round the point that was lined up on the ruler.
Step Ten
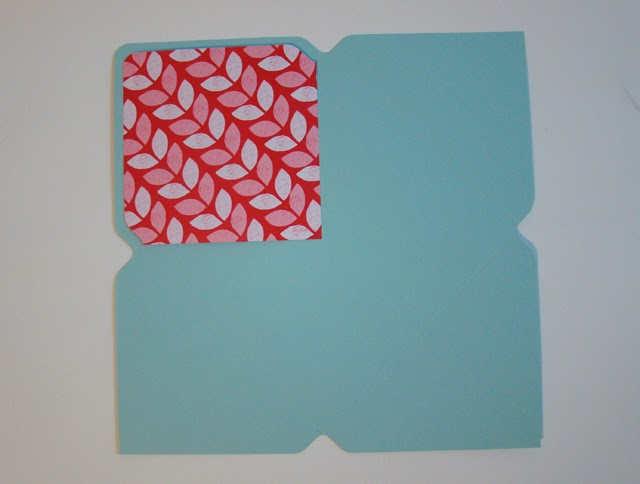
10. Adhere the liner to the envelope with the fat side of your Tombow Multipurpose Liquid Glue. The sides of the designer series paper have a slight point to them that you can use to line up with the score line.
Step Eleven

11. Fold in the sides of the envelope and place sticky strip on them.
Step Twelve

12. Remove the sticky strip liner and fold up the bottom of the envelope. You now have a perfectly lined envelope without wasting designer series paper.
Sealing the Envelope

If I will be giving the envelope in person, I create a seal to hold my envelope shut. That way the recipient can see the pretty liner when they pry the top flap open. To do this I stamped "Happy Heart Day" in Real Red ink on a sheet of Avery labels and punched it out with the Label Bracket Punch. If I'm mailing the envelope, I use sticky strip to seal it. Happy Stamping!
Stampin’ Up! Supplies
click on the product for price and details


Great Tutorial! Thank You!!!
ReplyDeletegreat tutorial, thanks for making it look so easy
ReplyDeleteGreat tutorial Brenda!! Now I might actually have to make some envelopes to use!!
ReplyDeleteExcellent tutorial and a lovely project - a lined matching envelope makes such a difference to a special card or gift. Thankyou.
ReplyDeleteYou rock. Thanks so much for this.
ReplyDeleteThank you so much for this tutorial. I have owned this tool for over a year and you were the 1st to ever get me to figure it out and be able to complete an envelope! You oh so rock!
ReplyDeleteI'm so glad that my tutorial was helpful to you!! :)
DeleteSusan, I just created another tutorial with the envelope punch board that you might be interested in. Check out this little box: http://www.qbeesquest.com/2018/01/kit-kat-candy-box-2.html
DeleteThe step-by-step instructions are clear and easy to follow. Thank you!
ReplyDelete